 All buttons and LEDs installed, now time to hook up arduino and test a sketch
Monday, July 8, 2013
Changing resistors
The dome buttons are lit by a LED set up for 12V DC. Replaced resistors in each LED with a 100 ohm resistor so now can use 5 VDC (30mA per pin) - would be better if it were 20mA but had 100 ohm resistors and arduino can source up to 40 mA per output pin.

Whack-A-Mole original
An original (or near original) Whack-A-Mole at Enchanted Forest in Old Forge, NY.

 Beautiful!


Saturday, July 6, 2013
Test light and switch on Dome buttons
 First test the switch and LED on the dome buttons. Ran simple Blink and Switch sketches on Arduino
Whack A Mole Dome
Inspired by Sparkfun and their Whack A Dome I started a smaller version with only 9 buttons. Using their code as a start, here goes

 Start of the prototype. Counter display is from Adafruit and will be controlled by Arduino Leonardo

Cutting out board for buttons

Tuesday, June 4, 2013
CTD Mark 1
Finally Mark 1 version of the CTD is finished - after lots of careful planning to keep the PCBs on the datalogger shield, I needed to add a voltage divider so ended up with adding another board, so it looks like a dog's breakfast.

First deployment using an axe as a weight and a paddleboard to get onto the lake

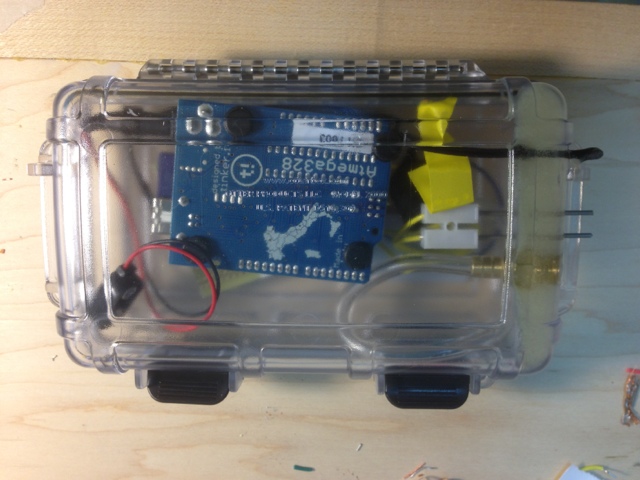 |
| Underside of CTD showing arduino and ports |
 |
| Top of CTD with extra board and also the pressure sensor is visible |


Thursday, May 30, 2013
Horseshoe nails
Horseshoe nail hooks
 and jewelry
"For want of a nail, the shoe was lost;
For want of the shoe, the horse was lost;
For want of the horse, the rider was lost;
For want of the rider, the battle was lost;
For want of the battle, the kingdom was lost;
And all for the want of a horseshoe nail."
- Author unknown
from All Things Crafty
"For want of a nail, the shoe was lost;
For want of the shoe, the horse was lost;
For want of the horse, the rider was lost;
For want of the rider, the battle was lost;
For want of the battle, the kingdom was lost;
And all for the want of a horseshoe nail."
- Author unknown
from All Things Crafty
Friday, May 24, 2013
Arduino sketch to read depth/pressure sensor
/*
//depthSensor1B sketch
//analog pressure sensor attached to analog pin
// added VCC measure directly to get better precision
// 1A works well
// 1B cleaned up code to make functions
// also added a DEBUG for Depth Sensor function that can be used if needed by uncommenting
*/
String sketchName = "depthSensor1B";
int pressureDepthPin = 3; // analog pin 3 connected to pressure sensor
float VCC = 5027.00; // actual measured voltage of VCC in mV
//int analogPressure = 0;
void setup() {
Serial.begin(9600);
Serial.print("Program name: ");
Serial.println(sketchName);
}
void loop() {
readDepth();
// Debug routines (uncomment to use
// Debug Depth sensor
debugReadDepth();
}
//++++++++++++++++++++++ Depth sensor +++++++++++++++++++++
void readDepth() {
float depth = calculateDepth ();
Serial.print("Depth = ");
Serial.print(depth);
Serial.println(" m ");
delay(500);
}
// Debug depth sensor
void debugReadDepth () {
float voltageDepthSensor = measureVoltage ();
Serial.print("DEBUG: Voltage: ");
Serial.print(voltageDepthSensor);
Serial.print(" mV ");
float pressure = calculatePressure();
Serial.print(": Pressure = ");
Serial.print(pressure);
Serial.print(" kPa ");
Serial.print(": Depth = ");
float depth = calculateDepth ();
Serial.print(depth);
Serial.println(" m ");
}
//****** Depth sensor reading **************************************************
float measureVoltage ()
{
int analogPressure=analogRead(pressureDepthPin);
float voltage = (analogPressure*VCC/1024.000);
return voltage;
}
float calculatePressure ()
{
int analogPressure=analogRead(pressureDepthPin);
//analogPressure/1024 to give volts
float voltage = (analogPressure*VCC/1024.000);
float pressureReading=(0.04+(voltage/VCC))*250;
return pressureReading;
}
float calculateDepth ()
{
int analogPressure=analogRead(pressureDepthPin);
//analogPressure/1024 to give volts
float voltage = (analogPressure*VCC/1024.000);
float pressureReading=(0.04+(voltage/VCC))*250;
float depthCalc = (pressureReading/100.00)-1.00;
return depthCalc;
}
CTD construction
Starting on the construction of a conductivity/depth/temperature sensor system. These CTD systems are used by oceanographers and limnologists to measure chemical parameters in water. The initial work is based on the SeaPerch project at MIT. They released a prototype version of a system in 2010 but it appears to have not gone beyond beta testing.
So starting from their hard work, I am going to make some adjustments and hopefully improvements.
The brains are the arduino microcontroller and then I will use an Adafruit Datalogger shield - I am using an old one and Lady Ada now has a more refined and improved shield but that maybe for version 2.
Just like the SeaPerch version, I started with an Otterbox and will use similar sensors except a 10K thermistor from adafruit. I used an array of these thermistors in a chain under the ice for the winter and they worked well.
So first thing is to drill holes for the sensors
 Drilling holes needs a little jog to keep it all stationary
 Tightening the barb for the pressure sensor
 Testing the resistanc eof the thermistor before pouring epoxy

So starting from their hard work, I am going to make some adjustments and hopefully improvements.
The brains are the arduino microcontroller and then I will use an Adafruit Datalogger shield - I am using an old one and Lady Ada now has a more refined and improved shield but that maybe for version 2.
Just like the SeaPerch version, I started with an Otterbox and will use similar sensors except a 10K thermistor from adafruit. I used an array of these thermistors in a chain under the ice for the winter and they worked well.
So first thing is to drill holes for the sensors
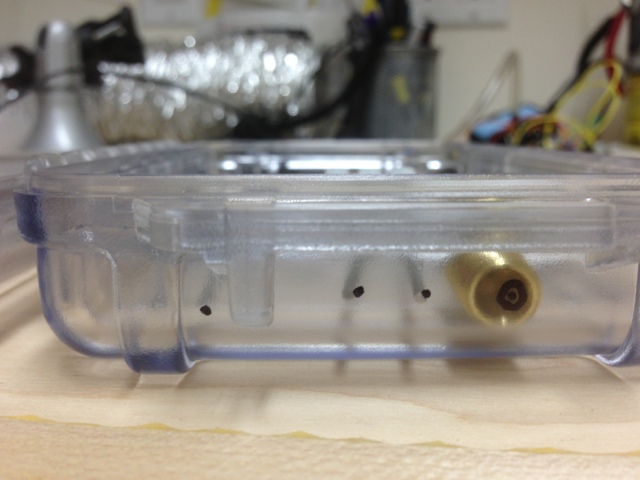 |
| Thermister on left 5/32" hole, then two 1/16" holes (1 cm apart) for conductivity probes, and then a 3/8" hole for the depth/pressure sensor |
 Drilling holes needs a little jog to keep it all stationary
 Testing the resistanc eof the thermistor before pouring epoxy
 |
| Sealing it all with epoxy - tape to protect the watertight seal |

 |
| Titanium rods are 4cm long |
 |
| Ventilation with epoxy is essential |
Wednesday, May 8, 2013

Friday, April 26, 2013

Whirlyworld love time clock
One of my early clocks was donated to the local college library fundraiser

Thursday, April 25, 2013
Axe maker
Steve Sunk is an incredible axe and blade maker from the Australian bush - great vimeo shot.
From
From
Art of Blacksmithing and Metal Workers on vimeo
Sunday, March 31, 2013
MakerPlot
Scientific applications of arduino can use MakerPlot to acquire and save data. Some interesting interfaces
http://www.makerplot.com/interface_videos.htm
http://www.makerplot.com/interface_videos.htm
Saturday, March 2, 2013

Thursday, February 28, 2013
ATtiny84 and arduino
Downsizing arduino projects using the ATtiny 45 (8 pin) and ATtiny 84 (14 pin) using the High Low Tech at MIT guidelines

Reference
The following Arduino commands should be supported:- pinMode()
- digitalWrite()
- digitalRead()
- analogRead()
- analogWrite()
- shiftOut()
- pulseIn()
- millis()
- micros()
- delay()
- delayMicroseconds()
- SoftwareSerial (has been updated in Arduino 1.0)
Subscribe to:
Posts (Atom)